Blog Archives

Thạch rau câu cốt dừa- Vietnamese coffee agar agar Coffee jelly

When it comes to a quick refreshing dessert, to me nothing can beat the Vietnamese coffee agar agar or Coffee Jelly.

* Jelly part:

7g agar agar powder

1 litre coconut juice or water

a pinch of salt

1/2 cup sugar (or sugar substitute)

16- 25g  Vietnamese instant coffee G7 (This is the link to amazon for those who want to know what it looks like)

** Coconut milk part:

1/2 cup coconut milk

1 cup water

2 tbsp tapioca starch or cornstarch

1/2 cup water

pinch of salt

*** Method:

For the jelly part: Bring coconut juice/water with salt and sugar to boil, stir in instant coffee. Add in agar agar powder, stir until it dissolves.

Pour this into any container that you prefer. I pour them in 5 beautiful glasses. Let them cool on rack while we’re making the coconut milk part.

Combine coconut milk, 1 cup water, sugar and salt in a pot. Bring this to boil over low heat. Stir tapioca starch in 1/2 cup water. Add this gradually to the boiled coconut milk while stirring. Simmer over low heat another minutes. Remove from heat. Let it cool.

Once the coconut milk is cooled down, pour it into each glass of jelly, cover and then refrigerate for about 2 hours before gulping hihi 😀

Thạch rau câu cốt dừa là một trong những món ăn gắn bó với thời cấp 3 của mình. Mỗi lần ra ăn lại nhớ đến mấy đứa bạn tíu tít. Ra trường rồi nhưng mình vẫn thỉnh thoảng quay lại đó ăn, lần nào cũng mua về cho em Khỉ một, hai cốc.

Công thức tặng Khỉ vì món này làm rất đơn giản, nhanh và có thể để tủ lạnh vài ngày ăn dần.

Phần thạch rau câu:

7g bột agar agar Thái Lan bán ở New May Wah hoặc chị nghĩ chợ châu Á nào cũng có. (chị quên mất không đo thử lại bằng thìa, nhìn áng chừng tầm 1 tbsp bột)

1 lít nước dừa hoặc nước

1 nhúm muối nhỏ tí xíu

1/2 cup đường

1- 1 1/2 túi cà phê hoà tan G7 (giống như vẫn ăn mọi khi thì 1 túi là đủ)

Phần cốt dừa:

1/2 cup cốt dừa (mua lon coconut milk tại chợ châu Á luôn)

1 1/2 cup nước lọc

2 tbsp bột năng

1 nhúm muối

– Cách làm:

*Phần thạch rau câu:

Đun nước sôi+ muối, đường.

Hoà cà phê vào nước sôi.

Đổ 7g bột agar agar vào, dùng đũa khuấy đều đến khi tan hết.

Đổ vào cốc để nguội.

** Phần cốt dừa:

Trong lúc chờ rau câu nguội, nhớ để dành 2 tbsp nước để hoà tan bột đao.

Hoà số nước còn lại+ nước cốt dừa và đường,  khuấy đều đun sôi nhẹ trên bếp lửa vừa.

Vừa đổ nước bột đao ở trên vào nồi, vừa khuấy nhẹ, để lửa nhỏ liu riu chừng 1, 2 phút nữa, nếm nếu thấy thích ngọt hơn có thể điều chỉnh 🙂 Đợi phần cốt dừa nguội bớt.

** Khi rau câu và cốt dừa đã nguội, rót nhẹ cốt dừa lên mặt rau câu. Để tủ lạnh ít nhất 2 tiếng trước khi ăn 😀

Chị lại mới làm nên chợt nhớ ra món này đơn giản nên gõ lại cho em Khỉ.


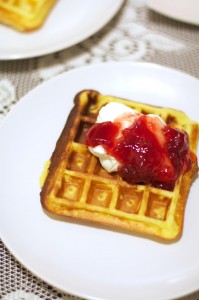
Waffles- different method adapted from Ladurée

Gaufres maison, j'ai testé une recette Ladurée ce soir. Tried a waffle recipe from my Laduree book.

Gaufres maison Tried a waffle recipe from my Laduree book.

Tried a waffle recipe from my Laduree book. This is already adapted to my taste as I found the original recipe makes really thick batter; and I want more sweetened waffles. I added more salt and milk too. 

75g cake flour

200ml whole milk

50ml whole milk

50ml creme fraiche or sour cream

40g sugar

1tbsp water

1/4tsp salt

30g unsalted butter

3 large eggs

1/4tsp vanilla

-Sift flour.

-Bring 200ml milk, salt, sugar to a simmer over medium low heat. Remove from heat.

-Dump in sifted flour. Use a wooden spoon to stir quickly until it forms a mass that pulls all flour away from the sides of the pan.

– Let it rest 1-2 minutes.

– Beat in one egg at a time with a hand mixer at low speed (1 or 2)

– Add the rest of milk and crème fraiche or sour cream and water.  Mix until incorporated.

– Let it rest 1 hour before making waffles.

– Heat the waffle iron, use butter spray if needed.

– Cook approximately 6-8 minutes until golden depending on how powerful the waffle iron is.

**I like to eat mine with whipped cream and some strawberry jam, A has them with salted butter.

I made waffles with many recipes before, this is the 1st time I’ve made them with this method. I was so excited to see how it turns out. I think they are richer in taste. I might try incorporate this with the adding-meringue method next time.

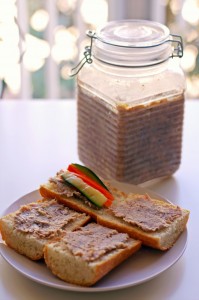
Rillettes de porc- Pork rillettes Patê thịt kiểu Pháp

Among many dishes that make me miss France are rillettes. Anytime A and I come ‘home’ for Xmas or summer, we will be treated with one or two precious jars of the red Bordeau Chesnel rillettes de porc. Rillettes just go great with freshly baked baguettes. I feel like finishing a jar at one go, which I definitely shouldn’t.

To me, rillettes quite resemble some braised pork dish that we have in Vietnam. The flavor is delicious yet pure.

I looked for recipes online first of course. Almost all recipes require different types of herbs and cuts of meat. However the flavor comes to my mind is much less complicated. I’ve decided to cook it my way with much simple ingredients. The list found on the Bordeau Chesnel website just says:” porc 100% français, sel, poivre, tout simplement”. So that was exactly what I used to recreate the dish.

There’re only two points to bear in mind: first is to “poach the meat in fat very slowly so the fat renders completely“; second is to cook on low heat.

Rillettes du porc

RILLETTES DE PORC

500g shoulder pork (cubed)

350-400g leg meat (cubed)

100-150g lard (fat) (cubed)

1 yellow onion (chopped)

2 cloves of garlic (optional) (minced)

Water or vegetable/ meat stock enough to cover the meat.

Pepper and salt to taste.

Method:

  • In a stock pot, melt the lard on medium low heat until you have at least a table spoon of fat. 
  • Add in onion and garlic, stir until they are soft and have fragrant smell. It probably takes 2-5 minutes.
  • In the same pot, brown the meat on medium high heat. Don’t need stirring but turning the meat to brown all sides.  Seasoning with salt and pepper.
  • Add water or stock as you like, but the water level should only be enough to cover the meat as you will cook until all the moisture is removed and the rillettes deepen in color.
  • Bring this to boil, reduce the heat to low. Cover the lid. Slowly simmer for 2-3 hours (yes 2-3 hours until the meat can fall apart when you stir with a spoon and the broth is clear)
  • At this point you can taste and add more salt and pepper or any other herbs.
  • Transfer the meat into a food processor/ blender to mash the meat and make it easier to spread on bread. 

Make sure the jar you want to store rillettes is hot, spoon in the rillettes to make sure there is no air pockets in the jar. Refrigerate rillettes in an air tight jar.

Store bough rillettes have fat on top to seal air and make them last longer. You can do the same by rendering some lard and pour it over the already set rillettes. Or just don’t bother because my rillettes actually stay alright for a month now without any seals.

Any time I cooked rillettes, I experimented by adding some different herbs and stocks but my bf always prefers the most simple version of salt and pepper only. To us, the rillettes taste extremely authentic 🙂 (as compared to our favorite Bordeau chesnel rillettes)

The homemade product, without a doubt contains much less fat than the store bought version, so it might feel less spreadable but the feeling of making your own rillettes is absolutely rewarding and there’s no guilt in eating a whole jar. They are wonderful to serve with bread.

Enjoy!

Swiss rolls

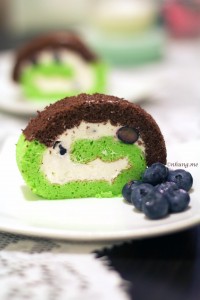
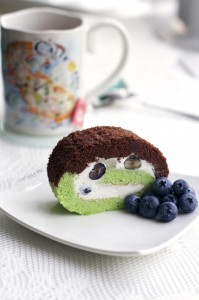
After baking numerous batches of swiss rolls, I stumbled upon a new recipe by Chef Keiko Ishida and was intrigued. The pandan swiss roll recipe calls for cooking butter and flour to form a dough, a little like making cream puffs (choux)! I tried it out right away since I love pandan leaves and always have them on hands (but in a small jar as pandan paste though).

However, A is not a big fan of pandan, he is a pure chocolate lover and it led me to think of making a combination of the two. I jazzed up some of the most basic swiss roll with a huge bundle of cocoa powder for half the baking pan and the other half is the new pandan swiss roll recipe.


It came out as an absolute success! A and I literally can’t have enough of it. I made a batch three times bigger than our normal cake, and we have it at least three times a day for morning tea, for afternoon tea and midnight snack (gosh). The pandan taste is rather mild and elegant is greatly complimented by the dark rich flavor of dark chocolate part and it’s all lightened up by the freshness of blueberries in the whipped cream filling.

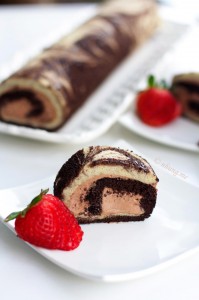
I love this so much that I decided to make another combination: chocolate and pink rose color (which initially I wanted to make into a cherry blossom theme, you know with the flowers patterned on the skin) I was thinking of making this for a few days before rolling my sleeves up and making it. I drew out my plan so that I won’t mess it up. Well, but then after baking, this is when reality hit me, the part I wanted to be soft pink turned light orange despite how much I mixed in the food coloring. I piped it out to make a nice flower pattern; after baking, all the piped patterns were gone. I was lazy to peel of the bottom skin so it was on here and there on the roll.

On the bright side, this time I did roll the cake a little tighter leaving it with a better shape.


Oh well, we still eat big gulps of it though.


Bourbon biscuits- Bánh quy Bourbon Anh

Bourbon biscuits, according to wikipedia, were first introduced in London in 1910 as thin oblong dark chocolate biscuits sandwiched together by chocolate fondant. I have never been to the UK (at least until now),  might I say I’m lucky that I was introduced me to the delicious gem. I haven’t found a place to buy Bourbon biscuits where I live. Here’s an attempt to make these British bourbon biscuits. I first came across this recipe two years ago and tried making the biscuits with this, but was not happy with the final results. So I changed ingredients as my liking and made my own recipe.

BOURBON BISCUITS

Homemade bourbon biscuits

*Biscuits:

110g AP flour ( approximately 1 cup if you don’t have an electric scale)

60g butter at room temperature ( 1/3 cup)

50g castor sugar

10g brown sugar

pinch of salt

1/8 tsp baking powder

1/8 tsp baking soda

20g unsweetened cocoa powder (I really recommend Van Houten’s or Ghirardelli or even higher quality)

(1 tsp Bird’s custard powder) (optional)

1 tsp vanilla essence

2-3 tbsp cold full cream milk (if the dough is too difficult to work with)

** Filling:

1/4 cup butter at room temperature

Icing sugar to taste (50- 60g icing sugar)

2 tbsp cocoa powder

a few drops of vanilla essence

***Method:

Biscuits:

–       Cream butter and sugar until the mixture becomes light and fluffy

–       Add vanilla essence

–       Sieve all the dry ingredients into the creamed mixture.

–       Mix until incorporated and add cold milk.

–       Roll the dough into a ball, let it rest at least 30 minutes in the fridge.

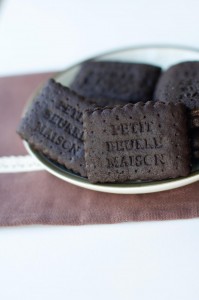
–       Shape it using an oblong cookie cutter and some toothpicks. My dear sister gave me this fantastic cookie cutter from Larousse for Xmas three years ago, which I haven’t used and wanted to use for this occasion. The cookie cutter is of this gorgeous purple color and how lovely that it says “le petit bourbon beurre maison” (I wish hihi)

–       Preheat the oven at 300F or 160C 10 minutes while you let the shaped cookies in the fridge.

–       Bake them at 300F/160C for about 12 minutes.

–       Lower the heat to 200F/100C, bake for another 5-7 minutes depending on how thick your cookies are. When you shape them, I think it’s better to flatten them out a little bit more so that when they’re baked they won’t be much thicker than the store-bought bourbons. Mine ended up a little thick.

–       Let them cool completely on rack before you sandwich them together. If they touch a little soft when cooled, you can pop them back in the oven for another 5 minutes at 200F/90C to dry them completely. They should be crispy, scrumptious and have a dark rick chocolate flavor but not burnt.

***Cream filling preparation:

Cream the butter and icing sugar until light and creamy, add cocoa powder and vanilla. If you have some whiskey bourbon on hands, add a tsp to give the cookies a little kick.

Hope this will help fill your cravings for bourbons like me!

Vietnamese translation:

Bánh bourbon ra đời từ đầu thế kỷ 20 (1910) tại London, Anh. Từ đó, bánh quy bourbon đã trở thành một trong những món bánh phổ biến tại Anh. Bánh  hình chữ nhật, có hương vị sô cô la đậm đà, với kem fondant sô cô la mát ngọt. Mình không sống tại Anh, nhưng yêu thích món này.

Công thức bánh rất đơn giản nhưng ngon và rất thoả mãn cơn thèm sô cô la:

*Biscuits:

110g  bột đa dụng (khoảng 1 cup bột nếu như bạn không dung cân)

60g bơ nhạt ở nhiệt độ phòng ( 1/3 cup)

50g đường  trắng

10-20g đường hoa mai vàng (nâu)

1 nhúm muối  nhỏ

1/8 tsp baking soda

1/8 tsp baking powder (men nở)

20g bột ca cao loại chất lượng tốt, không  ngọt(mình thích Van Houten của Hà  Lan hoặc Ghirardelli của San Francisco)

(1 tsp bột custard ) (không bắt buộc)

1 tsp vanilla

2-3 tbsp sữa lạnh

** Filling:

1/4 cup  bơ ở nhiệt độ phòng

Đường bột tuỳ khẩu  vị(50- 60g icing sugar)

2 tbsp bột cacao

vài giọt vani

***Cách làm:

Đánh bông bơ và đường tới khi mịn và thành kem màu vàng nhạt.

Trộn vào vani

Rây toàn bộ các nguyên liệu khô vào bát trộn bột ở trên, trộn tới khi đều, cho thêm sữa lạnh nếu khối bột khô.

Lăn khối bột thành hình tròn, cho vào tủ lạnh ít nhất 30 phút trước khi mang ra để tạo hình.

Tạo hình bánh có thể dùng dụng cụ cắt bánh(cookie cutter) và tăm để tạo hình. Cookie cutter này có thể mua tại fnaq hoặc amazon với từ khoá Larousse le petit beurre maison (bánh bơ homemade).

Bật lò 300F/160C 10 phút trước khi nướng bánh. Nướng khoảng 12 phút. Sau đó hạ nhiệt độ xuống 200F/100C nướng tiếp 5-7 phút tuỳ thuộc vào độ dày của bánh.

Bánh sau khi để nguội hoàn toàn trên giá, giòn và có vị sô cô la đậm đà.

*** Làm nhân kem cũng rất đơn giản như sau:

Đánh bông kem và đường bột, trộn them bột cacao và vani. Nếu ai có sẵn rượu whiskey bourbon có thể cho them một muỗng cà phê để tang them hương vị cho bánh.

Phết kem lên một mặt bánh đã nguội hoàn toàn và ghép  lại.

Chúc mọi người thành công và yêu thích món bánh Anh này.